
It’s fall here in North America and the weather is turning cooler and the leaves on the trees are starting to drop. This means Halloween is fast approaching! This day is becoming increasingly popular with adults. One of the many traditions is to take a pumpkin and carve it, place a candle in it and set it outside on Halloween night.
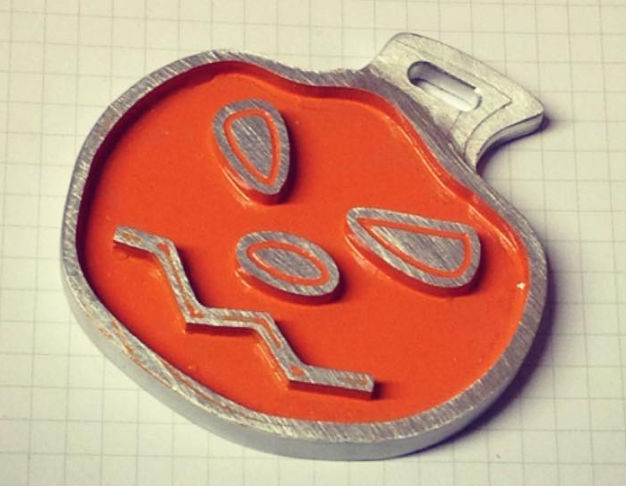
The Pumpkin Key Chain is my take on pumpkin carving. It’s guaranteed to last longer than your average pumpkin. After all, it’s made from 6061 aluminum. Some might say this is over kill, I say its rugged!
If you would like to build your own, a 3D cad file, g-code, setup sheet and materials list is included in the download link.
Click Here to Download the G-Code
The included full materials list details exactly which raw material and end mills you need.
Introduction
As you may recall, I am on a key chain kick right now. They are simple and fun to make. I don’t have to worry about tolerance stack up or other more advanced considerations. Check out the X key chain I built here. The process to build a pumpkin key chain involves creating the design, generating the tool paths, preparing the raw material, machining the part and finishing the key chain.
Overview
I started by creating a few hand sketches with a pencil and paper. There is much more freedom to be creative when you put a pencil to paper. My philosophy is to take a blank 8-1/2 x 11 sheet of white paper and just start drawing. Don’t worry if you are “bad at drawing.” That is not the point. The goal is to get the ideas from your brain onto paper. There is plenty of time to go back and make them pretty later. I try to get at least three variations of what I am thinking on paper. Next, I take all the best features from each sketch and roll them into one semi-finished sketch.
Now it’s time to make it pretty. We need to get the hand sketch into CAD. The best way I have found to do this is by taking a digital picture of the sketch and importing that into Fusion360. With the image set as a canvas background, I trace the lines in CAD. At this point I usually turn off the canvas and begin to push and pull the 2D sketches to create the 3D model. Feel free to take as much time as you want to make the 3D model “pretty.” Again, the original canvas sketch is just to capture the design intent.
In my past key chain work, I discovered that outlining the shape or features with a very shallow v-notch is a great way to make the features standout once they are painted. I did this with the eyes, nose and mouth of my pumpkin design. Creating the tool path for these outlines starts in the CAD environment of Fusion360. Click on the feature you want to accent and create an offset sketch ~.050” inside of the feature.
Now when I move to the CAM environment, I use the “Path” type tool path and select the offset sketches. I typically set the depth to ~ .030”. These can always be made deeper once the part is being machined by lowering the Z zero for the engraving tool.
I used standard tool paths to cutout the part from a ¼ thick piece of 6061 aluminum.
Since I am only making one or two of these, the tab feature in Fusion360 was a natural fit as the work holding method. The drawback to tabs is they require hand finishing to remove the tabs and blend the area into the part.
Next, I spray painted the entire front face of the pumpkin key chain orange. Once dry, I wet sanded the front face with 220 grit sandpaper. This removed all the paint from the high spots leaving just the pockets filled with paint.
If you are interested in building you own, click below to download the g-code. The link also provides access to a complete parts list, including the necessary end mills to recreate the project.
Click Here to download the G-code for this project.

Rendering of Fusion360 CAD File
How I Did It…
Collect the Parts
Step 1 – Download or create the g-codefor the Pumpkin Key Chain – Click Here to download a zip file that contains the following:
– Three (3) unique G-Code files, 1 for each CNC machining operation
– Fusion360 CAD file of the part with CAM tool path
– A setup sheet that details the stock, end mills, & machine operations
If you understand how to use Fusion360, you can update the design or even the CAM to suit the endmill sizes you have on hand. If not, you can ignore the Fuion360 file and just use the g-code files and corresponding endmills.
Step 2 – Order or scrounge your supplies.
Raw Material – I started with a piece of 6061 aluminum that was ¼” (.25”) thick and ~ 2.25” square. The link below provides a source for the material if you do not already have some on hand.
Note – the following links are affiliate links. If you purchase using these links, I receive a small commission which I use to help defer the cost of operating this site. The cost to you is the same whether you use the links or not.
1/4″ THK X 2-1/2″ x 12″ Aluminum Flat Bar, 6061 – This material is slightly larger than needed but will also allow you to make an X Key Chain.
End Mills – Would you believe this simple little key chain requires 3 different endmills? They are listed below. Again, product links are proved but if you have the correct size on hand, by all means use those.
Operation 1 – 3/16 Flat Endmill – Face the part, rough out the pocket, & profile the part. I used the 3/16 endmill with a 3/8 shank from the set below.

Operation 2 – 5/64 Flat Endmill – pocket detail around the eyes, nose and mouth

Operation 3 – ¼” (.25) Diameter Chamfer Tool – Used for the engraving $21.87

Prepare the Stock
Step 3 – Cut the raw material (stock) slightly over size. If you have your own stock then I recommend adding an 1/8 inch to both the length and width. We will trim this down in the next step.
Stock Dimensions – Aluminum plate 6061 .25” THK 2.5” wide x 2.5” long
Step 4 – Make two parallel sides on the raw material so that it will clamp securely in the vise. I do this by standing the material on end in the vise and milling one edge. I use my CNC machine like a manual mill and jog the machine to create the flat edge. Next, I flip the stock 180° so that the flat edge is now against the bottom of my vise. Jog the machine manually to flatten the edge.
Step 5 – Draw two lines on the part using a pencil or Sharpe that connect opposite corners. See the example below. This gives us the center of the stock which we will use later for our x = 0 and y = 0.

How to find the center of the raw stock.
Step 6 – Place the raw material in the vise with the parallel sides against the vise jaws. I have a set of step jaws in my vise so I do not need parallels. If you do not have step jaws then grab a set of parallels so that the top of the part is just slightly above the vise jaws.
Step 7 – Set the machine X & Y = 0 at the center of the stock. Jog the machine to the intersection of the lines and select “Reset X Axis” to zero X and “Reset Y Axis” to zero Y in Universal gCode Sender.
Step 8 – Load the 3/16 flat endmill into the machine and set Z = 0 at the top of the stock. I like to use the paper method by carefully jogging the machine down and hold a piece of paper between the stock and the bottom of the endmill. I wiggle the paper as I jog the tool closer to the top of the stock. When I cannot wiggle the paper anymore, I set this to Z = 0. Note, your Z height will be off by the thickness of the paper (typically .003”) but as long as we use the same paper for each of the Z = 0 settings for all the tools, we will be fine.
User Tip – Cutting Air
Once you set your Z zero position jog the machine up 1.0 inches and reset the Z zero at this location. This will allow you to run the first operation 1 inch above your stock to ensure everything works the way it should before you start cutting the aluminum. This is commonly reffered to “cutting air” since the machine should not make any chips. Once you are satisfied with the gCode, reset your Z zero and run the program.
Machine the Part
Step 9 – Run operation 1 (op 1) – Find the g-code file named “Pumpkin_Op1_RevA.nc” and run this file.
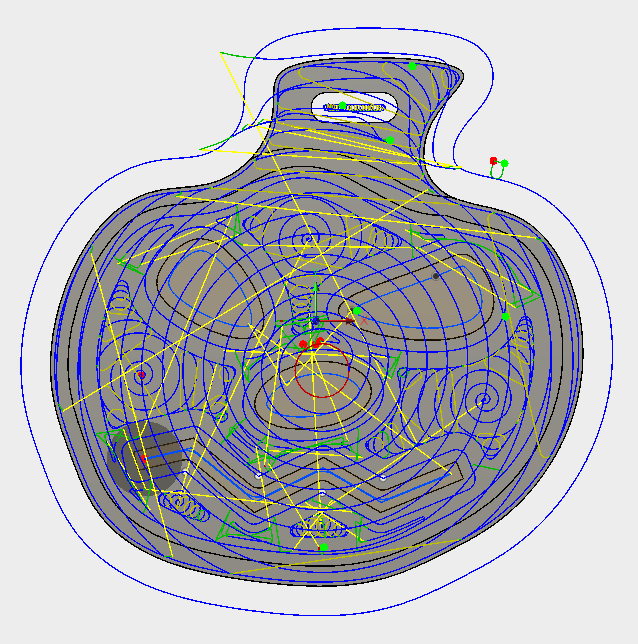
Tool Paths for Pumpkin Key Chain Generated in Fusion360
Step 10 – Load the 5/32 flat endmill into the machine and set Z = 0 at the top of the stock. Use the paper method described above.
Step 11 – Run operation 2 (op 2) – Find the g-code file named “Pumpkin_Op2_RevB.nc” and run this file.
Step 12 – Load the chamfer endmill into the machine and set Z = 0 at the top of the stock. Use the paper method described above. Be extra careful here to ensure you do not drive the point into the stock.
Step 13 – Run operation 3 (op 3) – Find the g-code file named “Pumpkin_Op3_RevA.nc” and run this file. If the engraving is not deep enough for you, go back and set your Z = 0 a few thousands (.005”) below the top of the stock and re run the file. This will make the engraving deeper. You can repeat until you get the desired look.
Step 14 – Remove the part from the mill and deburr as needed.
Step 15 – Cut the tabs to remove the part from the stock. I like to use a pair of heavy duty wire cutters to cut the tabs. I usually wear gloves for this step since the stock can be sharp.
Step 16 – Clean up the perimeter of the pumpkin with a rotary tool using a sanding wheel and scotch brite wheel. (I have an older Dremel® model similar to the one below with a flex shaft that works really well)
Dremel 3000-1/25 120-volt Variable Speed Rotary Tool Kit
I didn’t realize how much I would use/like a flex shaft attachment for my Dremel® until I used one. I don’t think I have removed the flex shaft since I installed it.

Dremel 225-01 Flex Shaft Attachment

Paint and Finish
Step 17 – Use masking tape to cover the edges of the pumpkin where you don’t want to get the paint.
Step 18 – Spray the front face of the pumpkin with paint. I found a few lighter coats work best.
Step 19 – Let the paint dry. (Yes, this is a step…)
Step 20 – Locate some 220 grit sand paper and get it wet. Also wet the face of the pumpkin with the pocket. This will help keep the sanding dust from sticking to the paint. Place the sand paper on a flat surface on sand the pumpkin (face down) in circular motion
Step 21 – Rinse with water and dry
Congratulations, you are done!
Conclusion
This is a fun way to practice your new CNC machining skills. When you are finished, you will have an extremely durable pumpkin.
What projects are you working on next? Leave a comment below and share what you are making.
Have a project idea or need some help on some gcode, drop me a line at Tim@DIYMachining.com
Don’t forget to download the Pumpkin Key Chain project files. Click the link below.
Click Here to Download the Pumpkin Key Chain Project File
Thanks for reading. Until next time… Tim
/using java,arduino uno,grbl,ugs. pumpkin key chain is reproducing 20 times larger than 40mm x40mm shown on visualizer. What is wrong. calibration on ugs reads correct. thanks for any help you can give. this is a cnc machine i just built and jogs well. Guy
I appreciate the comment. Based on what you described, It sounds like the steps/mm setting is not correct. Click here for details on how to set the steps/mm.